If you have been growing plants for any length of time you will know how important it is to get your soil pH compatible with the plants you want to grow. When you adjust your soil pH so that it suits the plant, wonderful things can happen. There are many ways to check the pH of your soil, some are expensive and complex, and others are simple and quick. Soil pH test strips can be a quick and easy way to understand where your soil pH currently sits. So let’s find out how to test soil pH with strips.
How to test soil pH with strips
1. Collect your soil sample
The first part of testing soil pH is collecting the soil sample to be tested. depending on how small or large the area is you can collect your soil sample in a number of ways.
If the area is large – like a field – you should sample the plot in an X formation. Then take a sample of the soil every 10 yards/ meters.
To take the sample you should use a soil corer – a metal tube you push into the ground 4 to 6 inches, and then you eject the plug of the soil sample into a bucket. If you don’t have a soil corer a small spade or trowel will do. Continue this process until you have the full area covered.
At the end of this process, you will have a bucket of soil which you should mix up thoroughly and then take your final soil sample from. The final soil sample only needs to be about a handful of soil.

If the area is smaller – like a garden- then you should divide the area into sections and take a sample from each section. You shouldn’t need to take a sample any closer than every 3 yards/meters
2. Prepare your final soil sample for testing
Once you have your final soil sample ready for testing you should add it to a bowl or some type of vessel to hold the soil and the water you will add to it. As I said before less than a handful of soil is needed.

The soil in this container should be free from stones sticks, grass, or other bulky materials which might make mixing the soil with the water difficult.
3. Adding water to the soil sample
The next stage is adding water to the soil so we can take a reading using the pH test strips. Many guides have stated that you should use deionized water to add to the soil, but in reality, not many people have deionized water laying about the place. If you live in a developed country with water treatment works – they adjust the tap water pH to a more neutral limit (pH 7 to pH 8) before supplying the public so it’s not that big of a deal to use tap water rather than deionized water.
Hard water regions have naturally higher pH around pH 8 which is more alkaline and soft water is around pH 6.5 which is more acidic. Water treatment works don’t like water to be less than pH7 because the acidity can lead to problems such as pipes corroding, metals being released into the water causing health problems, and the water can have a bitter taste.
The easy way to remove doubt about your tap water pH is to use a test strip in it before you add it to the soil. This should confirm if it is neutral or not.

So once the soil is added to the container you should add in your water (tap or deionized) until the soil is covered completely with water.
4. Mix the soil sample and water together
The next step is to mix the soil and the water together, you can use a spoon or some other utensil. Once you have mixed the soil with the water it is important to let the water diffuse through the soil for 20 to 30 minutes. This will allow the acids and alkalies to transfer from the soil into the water.

5. Filter the soil from the water
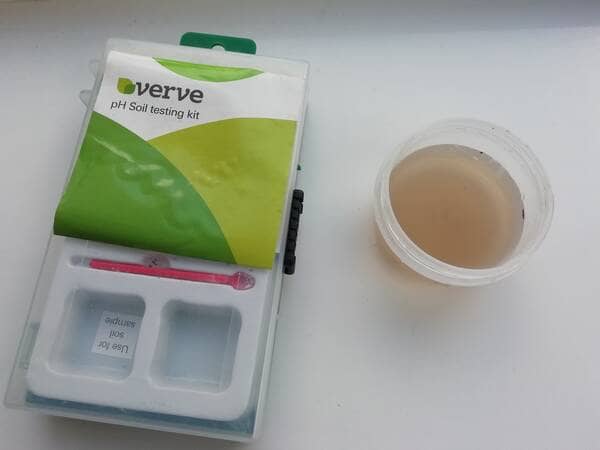
After the water and soil have sat mixed for half an hour you should filter the soil from the water. You can use an old tea strainer or a paper filter from a coffee machine. It can take a while to allow the water to strain through this if your filter mesh is fine. The point of straining the soil from the water is so that when you put your pH strip in the solution it doesn’t coat the strip with muck/soil which can make it hard to see the color of the strip.

6. Take the pH reading using the test strip
After you have filtered the solution you should be left with quite a clean solution for you to dip your test paper into. Take one strip from your pH test book and dip the end of it into the water solution. The instructions on the test strips will tell you how long to leave it there – but ideally, you should leave it there for at least 5 minutes.

Once the time has elapsed, you should compare the colour of your test strip to the colour chart on the side of the pH test strip book. When you find a colour on the book which matches your test strip – this will tell you the pH of your soil sample.
Accuracy of pH test strips
While it is always beneficial to have any indication of where your soil pH lies, pH test strips are not designed to give accurate measurements. It is recommended to use a digital soil meter to provide you with an accurate pH reading to detect small changes in pH.
Having a pH meter that is more accurate is essential when you are in the process of making amendments to your soil each year. This can show you if you’re moving in the right way. Often when you use pH strips it can look the same pH as the previous year, even though the pH may have increased or decreased by 0.5 or more.
Amending your soil pH
After you have read the pH of your soil, you may realize that you need to lower the pH or you may need to raise pH. Sometimes the pH is fine and it won’t need anything.
Usually, growers will know the soil type they live in and if it is prone to need the pH raised or lowered.
For example, those who live in peaty areas will have soil that tends to be acidic, so their priority lies with making it more alkaline – which results in lime / crushed limestone being added to the soil. Those who live in soils that are high in clay content – alkaline soils- they will be concerned with adding elemental sulfur, as it will acidify the soil.
How much of these amendments should you add?
As with most things related to growing plants, there is no one size fits all. Each plot of land has its own unique features and requirements. Every grower will get to know their plot and how it responds to amendments. My advice is to add the minimum amount required to give a result and re-test to see how it performed. The following year you can adjust the amount depending on the results from the previous year.
To summarise how to test soil pH with strips: you should collect all the soil samples, combine them into one small sample, remove the large debris, add water until it covers the soil, and mix thoroughly. After a period of 20-30 minutes place a pH test strip into the water solution, then when the allotted time has passed compare it to the colors on the pH test booklet to give you an indication of the pH of your sample.